
Yes, I don’t like dirt cake at all. I bought it from every single store that sells it & still … I HATE it. I don’t know but I always find it too sweet & watery; mmm … not my kinda dessert.
This Easter my kids are almost 2 years old & I really want them to start enjoying all our Easter traditions but they are still too young for coloring/painting eggs (we will end up with an EGG mess … I am sure hahaha). I searched the Internet for other creative ideas that my kids can enjoy & came across hundreds of dirt cake recipes. I liked the idea a lot as my kids will love decorating those little pots because they are now very interested in learning about trees, flowers & plants.
Besides, I couldn’t believe how easy it is to prepare this stunning looking dessert. NO baking whatsoever is required, just some crushing, mixing & whipping woohooo.
Dirt Cake is simply chocolate pudding BUT taken to a higher, better, sexier level in terms of taste & texture with cream cheese, butter, sugar & whipping cream. I followed the same recipe technique but made some changes in the ingredients & ratios to reach the SPOT ON chocolate taste I had in mind; light, fluffy, not too sweet yet deliciously rich.
Believe it or not; I ended up eating almost half the pudding mixture before even assembling the pots. Let’s correct the facts; I HATE STORE BOUGHT DIRT CAKE BUT LOVE LOVE LOVE THE HOMEMADE VERSION.
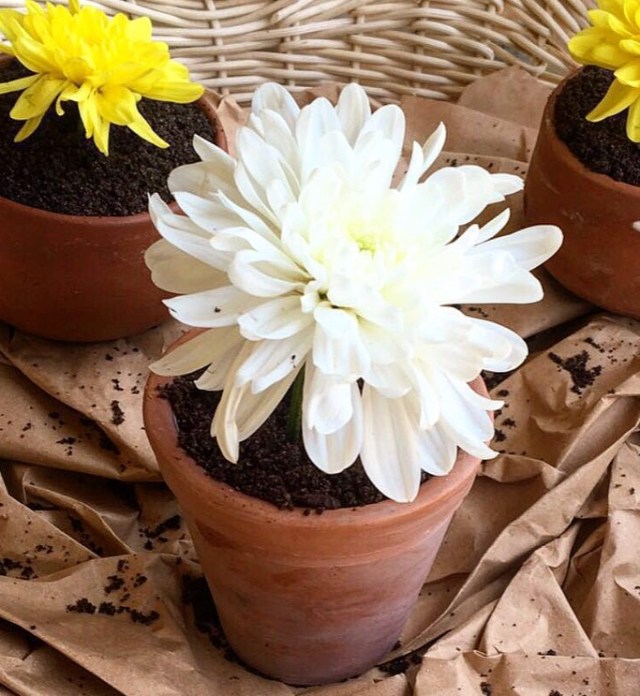
I went shopping & bought all kinds of decorations that my kids could use in bringing those dirt pots to life. We are now ready for Easter; I have single pots for the kids to decorate/eat & one large bowl to serve to my family after lunch! I am sure it is going to be a masterpiece that no one will ever guess it’s homemade.
Why you should be making dirt cake this Easter for your family?
- Sooooooooo easy; it takes less than 30 minutes to be ready
- No fancy ingredients required
- Can be prepared the night before
- Way tastier than store bought
- LESS LESS LESS expensive than store bought
- Kids will enjoy decorating it
- Adults will enjoy devouring it
CHOCOLATE DIRT CAKE
Ingredients:
- 54 Oreo cookies (don’t remove the middle white cream)
- 9 packs Danone Danette chocolate pudding (about 3 cups)
- 9 Kiri squares at room temperature
- 3 tbsp butter at room temperature (37.5 grams)
- 1/2 cup powdered sugar sifted
- 3/4 cup COLD whipping cream (see note 1)
Options for Decoration:
- artificial or natural flowers
- green leaves
- chocolate eggs
- jelly worms
- jelly beans
- gummy bears
- Easter eggs
- sprinkles
Directions:
- In the food processor, process the Oreo cookies into fine crumbs or place them in a ZIP Lock bag & smash them with a rolling pin (the white cream will disappear).
- In the bowl of an electric stand mixer or using an electric hand mixer, beat the Kiri cheese, butter & powdered sugar until you have a smooth fluffy mixture without any cheese or sugar lumps.
- Using a rubber spatula or a wooden spoon, mix the Kiri/butter mixture with the Danette pudding until totally combined (don’t beat them together; just stir them gently).
- Using a clean electric mixer or simply a hand whisk, whip the COLD whipping cream until stiff peaks form (don’t over beat so that it doesn’t become lumpy).
- Gently fold the whipped cream into the pudding mixture until no white streaks remain & they are fully combined.
- Start layering the single pots or 1 large bowl by placing some Oreo crumbs to cover the bottom, followed by some pudding mixture to cover the Oreo crumbs. (Keep making layers but make sure you end with Oreo crumbs (see note 2 & 3).
- Refrigerate for about 5-8 hours (up to overnight) before serving.
- When ready to serve, decorate with any of the above ideas. In case you are using FRESH flowers/leaves, wrap the stems with foil before inserting them in the pots.
Notes:
- Sometimes when you place whipping cream in the fridge, it turns into solid cream instead of liquid. To solve this problem, simply shake the pack very well & leave it on the kitchen counter until it becomes liquid again (about 30 minutes max). Pour the cream into a cup (only the quantity you need) then place the cup in the freezer for about 10 minutes. Your cream is now ready to be whipped!
- Instead of using pots, you can use single bowls/cups or 1 large single bowl/Pyrex dish.
- The thickness of the layers totally depends on your preference but make sure that the pudding layer is a little thicker than the crumbs layer so that you don’t end up with a dry dirt cake.
- This recipe can be halved or doubled.
Recipe adapted from allrecipes.com
